BUY AT
THESE LINKS:
amazon.com
iTunes Store
Alfred Music (wholesale)
Exclusively distributed by Alfred Music
COPYRIGHT ALERT
Renowned drummers Danny Gottlieb and Steve Forster have now completed an in-depth study guide to accompany George Lawrence Stone's Accents and Rebounds for the Snare Drummer and have kindly allowed us to post it here. It includes a lot of great teaching tips both from Stone and from the late Joe Morello, one of Stone's students described in the original book as an “outstanding perfectionist in modern drumming.”
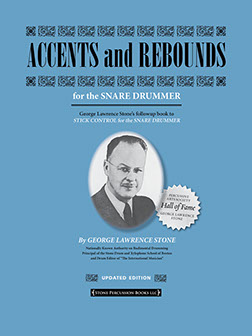
Accents and Rebounds for the Snare Drummer: Study Guide
by Danny Gottlieb with Steve Forster
©2014 Danny Gottlieb
Accents and Rebounds is a milestone in percussion literature in that it is the ONLY volume to specifically combine both Mr. Stone’s teaching innovations and those of his star pupil, Joe Morello. It was significant for me personally, when I started studying with Joe in 1969, as it was the only available published resource that featured the advanced concepts of the Stone/ Morello “Natural Body Movement” approach. Joe’s own Master Studies books were still in the works and had yet to be completed and released.
All of us who were lucky enough to have studied with Joe were exposed to an incredible, specific approach to hand technique, that if practiced correctly, yielded amazing results. One of Joe’s favorite methods for student evaluation during a first lesson would be to have the student play paradiddles, and then Joe would ask the student to work up the tempo. You would play as fast as you could, and then Joe would go much faster, and at some point you would realize he was playing with JUST his left hand. The reaction was always “WHAT IS THIS?” And then Joe would explain that it was a specific method, based on his studies with Joe Sefcik, Mr. Stone, and Billy Gladstone, that if you were interested in pursuing, he would be more than willing to share. His incredible control and expertise with this method (along with his genius ability as a jazz improviser) can be experienced in any YouTube video of Joe’s playing. Observe his hand positions, his touch, his incredible range of dynamics, and his unparalleled technical ability. All of these seemingly impossible performances had their basis in Mr. Stone’s teachings.
I felt (and still feel) that I had found the “Rosetta Stone” (no pun intended) of drumming and I was hooked. I was lucky enough to study with Joe on and off for forty years and, along with many of his other devoted students, am committed to preserving his legacy and passing on what I can of his teaching methods.
One of the more mystifying questions and debates between Joe’s students and others who have become aware of the Stone approach was just: Why did Mr. Stone and Joe Morello decline to document (in print) some of the specific techniques that would seemingly provide help in executing the exercises? There is no explanation in Stick Control, and nothing in Accents and Rebounds. The reason, as documented in Stone’s own words in the reissue of Stick Control, seems to be that neither wanted to force anyone into using the books with a specific technique. It was their hope that both Stick Control and Accents and Rebounds could be used by any student with any technique, so therefore, no explanation was needed. In addition, Joe Morello expressed that while you could make generalizations about the technique, it really needed to be taught on a “one-to-one individual basis.” Long time Morello friend and student Steve Forster says, “It was not that Joe wanted to keep anything a secret, but that he thought it would be difficult to describe this method in print.”
While this is true, with the passing of Joe Morello our primary connection to Mr. Stone’s methods has been lost, and the teaching of this system is left to the few remaining musicians who studied with Stone (notably Barry James and Vic Firth) and all of Joe Morello’s students (and their students). After careful consideration, we have decided to present a few of the technical concepts in the reissue of Accents and Rebounds, and to talk more about those concepts in this expanded version for the Stone website. We hope that this will help in the usage and execution of this incredible material, and this is presented as a tribute to these two great masters. This material is documented on video in Joe’s own words as a specific study suggestion, and in print in his many articles for Modern Drummer Magazine. After reading and reviewing the following text, we suggest viewing ALL available material featuring these concepts in Joe’s own words. The available videos are:
1) Joe Morello Drum Method 1: The Natural Approach to Technique
2) Joe Morello Drum Method 2: Around the Kit
3) Joe Morello and Danny Gottlieb: Natural Drumming, Lessons 1 and 2
4) Joe Morello and Danny Gottlieb: Natural Drumming, Lessons 3 and 4
5) Joe Morello and Danny Gottlieb: Natural Drumming, Lessons 5 and 6
Stone/Morello Natural Approach to Drumming
Please keep in mind that this is my (Danny’s) interpretation of Joe’s teachings and is based in my own personal study experiences to the best of my memory.
1. Hand Position Explanation
The first concept usually discussed involved how to hold the stick and specifically why a particular method was used. Joe would often ask, “Why are you holding the stick that way?” and the student’s answer would normally be: “I don’t know,” or “My teacher showed me this,” or “It feels good,” or “I saw it in a picture,” etc., but no SPECIFIC explanation. Joe felt that while you didn’t have to hold the stick with this method, at least there was a specific ideology behind it.
He would explain that if you held your hands down at your sides, then raised them up, holding your wrists above the drum, and then moved the wrists up and down in a waving motion, there would be no tension in the movement. His feeling was that you should then hold the stick with a grip that would duplicate this natural movement without any tension. The tension seemed to be caused by squeezing the stick between the thumb and the first finger, and therefore with this method, there would be no squeezing of the stick. With the right hand (matched grip) you would grab the stick, holding it at the first crease on the first finger. I asked Joe why and he said, “It is the strongest point for control. If you pick up an object, like a newspaper, you would hold it at this joint.” There would be an open space between the thumb and first finger, and no squeezing. The remaining fingers would just lay on the stick. (“If you have them on the stick you can use them.”) You would basically just hold the hand out, place the stick, and without changing anything, use as close to natural hand movement as possible.
For the left hand, the same approach would apply if using matched grip. For traditional grip, Joe illustrated that many drummers would hold the stick between the thumb and first finger. He explained that you could play with a fair amount of control with this approach, but ultimately it was a method that used squeezing, and would result in tension as you played at faster speeds. A better, more natural approach would be to rest the first finger on top of the stick, and let this be the point of contact to the stick, as opposed to squeezing between the thumb and first finger. You would then make the wrist turn in a natural way, without bending the wrist back or any unnecessary tension.
Pictures of Joe’s hand position can be found in his Master Studies books, and you can observe the specifics of his hand positions and watch the explanation in his words in any of the videos. The important concept to note is that how to hold the sticks, with a specific explanation, was an integral part of this approach.
2. Balance Point: Where to hold the sticks?
The next topic was usually WHERE to hold the sticks. Joe would explain that many drummers had different approaches, but with this method, finding a specific balance point was crucial to successful execution. He felt that it was much easier to make a stroke without tension if you held the stick at a balanced position (where the front of the stick is balanced to the back). I’ve always observed that Buddy Rich held the stick in a similar manner, and I have personally found that the balanced position allows complete freedom of movement and control. There is a photo of Mr. Stone and Joe examining the balance point in Joe’s Master Studies, and the balance point can be observed and explained in Joe’s own words in the videos.
3. Similarly Pitched Sticks
One of the goals of the Morello’s Natural Body Movement concept is to be able to execute strokes equally well with both hands, eliminating the concept of a weak hand. Joe would discuss Stick Control, and explain that there were no accents on the first three pages (those were left for Accents and Rebounds!). The idea was to strive for the same sound and same dynamic from each hand. By holding the sticks using this natural method, the ring of the wood would be very obvious, and the pitch of the stick an important characteristic in practice. If the sticks had different pitches, it was impossible to get the same sound from each hand. It was tough enough to hold the sticks with two different grips (matched and traditional), but when the pitch worked against you, it was impossible. As a result, one goal was to find a pair of balanced sticks. This was before the days of Vic Firth’s Perfect Pair™, and all of Joe’s students would drive every drum store owner crazy, rolling sticks on the counters, looking for a matched, non-warped pair! But this was an important concept!
4. Making the Stroke
Joe would ask you to make a stroke, and most drummers would start low, raise the stick up and then make their down stroke, or one stick would go up while the other went down. I think Joe called this “idle hand high.” Joe explained that with these two common methods, the upward movement caused tension, and that when you made the stroke, the volume was not consistent. He then explained Stone’s alternate approach where you would start the downward stick movement at a specific height above the drum, throw down the stick, and “accept the rebound” back to the starting position. In this manner it was like bouncing a basketball. There was no “up” involved, just down—letting the stick rebound back to the starting position. This way you were making one motion, without tension, and you could have completely consistent dynamics. By starting at the same position with no upstroke, you could get the same sound with just one exact movement, each time. If both sticks started at the same height, with the same pitch, and without tension, the sound would be very close to identical from each hand.
5. The Full Stroke
Joe described Stone’s approach as dividing practice methods and mechanics into three categories: wrist, arms and fingers. All of these strokes are illustrated in Joe’s own words in his videos, but for introduction, study, and information purposes, I will briefly describe them. The first basic wrist stroke is the full stroke. You would start at ceiling position (as close to straight up and down as you could go), throw the stick down without a preparatory stroke, and allow the rebound to return the stick to the starting position. This motion, as Joe described, would do three things: loosen the muscles (a great way to start your practice routine), give you a consistent sound from a loud (high position), and develop the reflexes. My interpretation is that it really paves the way for all other strokes, and as you develop the full stroke, through consistent practice, you really gain control and endurance at all other dynamic levels. The first three pages of Stick Control are a great source of practice for mastering the full stroke.
6. Controlled Strokes: The Down stroke and Upstroke
Now we get to the two strokes that most relate to Accents and Rebounds. Once the full stroke and half stroke have been developed to a proficient level, the two controlled strokes can be added. The down stroke starts like a full stroke, but instead of allowing the stick to rebound to the starting position, you stop at a lower, new position!
This is done not by squeezing, but by “NOT accepting the rebound,” as Joe illustrates in his videos. For the upstroke, there isn’t enough power to bring the stick back on its own, and after making the tap (or low stroke), you bring the stick back to a higher position. It is done as part of the execution of the tap stroke, and with a relaxed wrist motion with no tension or squeezing.
7. Label the strokes: letters or arrows
Now we have four basic strokes:
the Full stroke—labeled with an F
the Half stroke (also called a Tap)—labeled with a T
the Down stroke—labeled with a D
and the Upstroke—labeled with a U
When I studied with Joe, he would have us go through each exercise and label with the correct motion under the sticking. For example: to play four loud strokes, followed by four soft strokes, you would start with both sticks in full stroke position, and then label and execute as follows: Full, Full, Down, Down, Tap , Tap, Up, Up.
A student at UNF, Phillip Gillette, was convinced that he should label the strokes with up and down arrows. I told him that was not the way Joe would illustrate the practice. However, it has recently come to light that Mr. Stone used up and down arrows in marking lessons for his students!! Whatever works best! I find for myself that SAYING the stroke as I play it “Down, Full, Tap, Tap”, etc., helps the muscle memory retain the motion. But, again whatever works for you is best!
©2014 Danny Gottlieb
For permission to reprint or repost this article or any other site content, please contact Stone Percussion Books LLC here. We will contact the authors for further permission.

We recommend starting work with Stick Control . . .
. . . and then moving on to
Accents and Rebounds